Want to know how to cover objects efficiently? Ask someone who sews. That’s how I earned my knowledge. Really, this tutorial can apply to any cylinder that you need to cover: Bison tubes, peanut butter jars, water bottles, etc. If it’s a cylinder, this is how to do it neatly.
Materials:
- Camouflage duct tape (about $3 at Wal-Mart)
- Razor knife or Exacto knife (something with a sharp blade)
- Bison tube or other cylindeer
- Old magazine (for use as a cutting mat)
 Step one: estimate the amount of tape you’ll need
Take a look at your container next to your roll of duct tape. Think about how much tape you’ll need to cover half of the diameter of the bottom of the container and add just a little bit extra (maybe 1/4″). You can actually place the end of the duct tape on the bottom of the container, add a little extra and make a notch in the end with your scissors. Do the same for the top, but realize you won’t be covering the very middle of the top (where the Bison tube meets the keychain) and that the rim of the top is very, very narrow. Truly, an estimate is fine.
 Step two: cut the tape
This one’s pretty obvious. I always cut more length than I think I need without getting too crazy. I don’t want to waste tape, but a little extra isn’t a big deal.
Step three: cut fringe
 Place the tape sticky-side up (naturally) on the magazine. About every 1/4 – 1/2 inch, slice the tape from one side to the other, but don’t cut through the tape. Stay about 1/4″ away from the other side. If you do cut through the tape, it’s no big deal. We left a little extra length, remember? When you’re done, you should have a nice fringe. Do this for both pieces of tape.
Step four: roll onto the cylinder
 Lay the fringe for the main cylinder flat on your magazine, sticky-side up. Place the closed end of the main cylinder on the fringe so the cuts start where the cylinder ends. Slowly roll the cylinder onto the tape, trying to keep the uncut edge of the tape as parallel to the bottom of the container as possible.
Do this for the lid, too
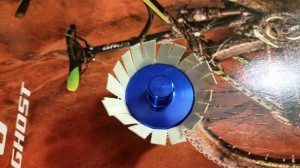
Step five: trim excess length and spread fringe
 So we left a little extra length when we first started. You can cut this off now and stick it to something to save for later use. You can use it to piece together fringe at some later point or use it if you mess up on this container. Just hang onto it until we’re done, in case we have to make repairs.
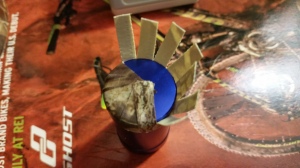
Flare out the fringe on the cylinder so that it looks like squid tentacles.
Do this for the lid, too.
Step six: fold down the fringe – main container
 Starting with any piece of fringe, lay it down on the cylinder’s closed end so that it stretches toward the middle. We didn’t measure this exactly and that’s fine. If you cross the middle or don’t quite reach it, you’ll still be covered. If you don’t come anywhere close to the middle, you’ve used the smaller piece of tape instead of the bigger one. Remove the tape and start over with the bigger piece.
Work your way around the cylinder, slightly overlapping each piece of tape.
Step seven: admire your main container
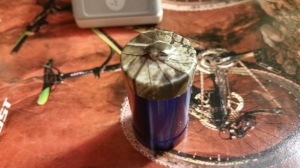 Pretty.
The whole bottom should be covered in a neat camo swirl. Admire it. It’s nice. If you have a little nipple in the middle of the bottom, don’t worry. This is normal. Your Bison tube is a mammal. No, really. This is just the excess duct tape. It’s not a problem, it’s a feature.
Step eight: cover the lid
 I’m not going to bore you with steps four and five. Just do ’em for the lid and we can all move on to step nine.
Step nine: don’t cover the key ring hole
 This isn’t a step as much as it is a caution. If you’re covering a Bison tube lid, the tape shouldn’t cover the key ring hole at the top. It’s O.K. for the tape to go up the sides a little, but you’ll need to unwrap the lid, trim off the excess fringe, and go back to step four if you’re about to cover that hole. Or, well, cover it for all I care. Just know that you’ll have to open it up with your Exacto knife or something similar if you want to use the key ring again.
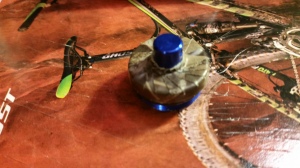 Step 10: admire your lid
Pretty.
Step 11: cover the main container
 Set your main container, rolly side down, onto your magazine work surface. Peel some of the duct tape off the roll. Compare the width of the duct tape to the cylinder’s length and make a slit in the cut-end of the duct tape to reflect this measurement. If you were wildly inaccurate with the first time we estimated lengths, you can go ahead and measure this one. It’s better to be a little short than way too long.
Pull off a generous amount of duct tape, knowing we’ll waste a little. If you want to measure this, that’s fine, but I never do.
Now that you have your tape, lay it flat on the magazine and place your main container on it, being very careful to align the mouth of the container precisely with the factory-cut edge of your duct tape. Roll the container towards you, keeping that factory edge even with the container’s mouth.
Step 12: admire the covered cylinder
 Pretty.
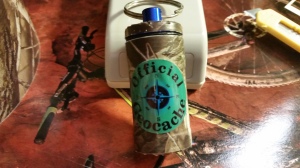
I’ve put an Official Geocache decal on mine. It’s a really nice vinyl decal: waterproof and repositionable. I don’t make any money from this product, but I do recommend it. Here’s where I bought mine.
Click here to download a .pdf of this tutorial: How to wrap a geocache container in camouflage duct tape – TeamDaveGeocaching blog
I hoped that this post helped someone. Did it? Let me know in the comments. Show me your pictures, too, if you have some. Do you cover your containers better than I do? Awesome! Teach me.

 Yesterday, my husband and I went caching along a trail that is dotted with geocaches. We found *squat.* Effing nanos hidden in the effing fence line. Best of all: the kiddie cache, what all the logs said was an easy find, was an impossible find. We trekked into the woods, braved thickets, spiders, and things, but couldn’t find this easy cache. We left, grumbling about the stupid Garmin Glo spinning us in pointless circles.


 will find helpful. (I’m Icemom_diane on Reddit.)") Geocaching Subreddit
Geocaching Subreddit


